I have been using Hamrick Vuescan to scan my negatives for quite a few months now and have seen quite a variety of workflow suggestions so here is my workflow version which seems to work quite well.
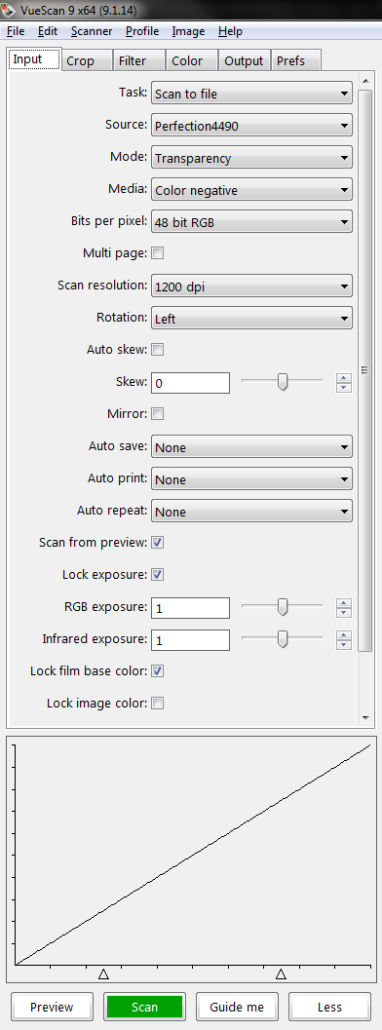
I’m going to start with the input settings tab. Most of these settings are pretty obvious, like using transparency mode and colour negative (if that’s what you are scanning). May as well use 48 bit RGB to get best image quality. 1200dpi is good for web use as it will produce scans of about 1900 x 1100 for 35mm film. Many screens are about 1920 x 1080 so scans will fill most screens fairly well. If scanning for print then you would probably want to use a higher dpi setting.
I tend to leave the “lock exposure” box ticked and set to “1” as this value seems to work fine with my scanner. For some reason I find that if I set the exposure value to anything other to “1” it does not give me the option of ticking the “lock film base color” box – not sure why.
I prefer to use “scan from preview” as this basically allows me to scan the whole transparency area, which is 2 rows of 6 frames for the scanner I use (Epson 4490). I started scanning each frame individually but soon got fed up with this.
One this is set up I hit “preview” and wait for it to scan – takes a couple of minutes usually at 1200dpi.
The next step is to set the film base color (film base colour if in the uk ;-)
When I started using vuescan I did not know what “lock film base color” meant so I did not bother with it but wondered why I was getting some strange colour casts on my scans.
Vuescan needs to be told what to “treat as black” and the answer to this is the strips of unexposed film between each frame. In reality this area is not totally transparent but instead has a strong orange colour so vuescan needs to “lock in” this colour so it can then subtract the cast out of the final image. It will make a good guess even without this info but it will often be very “hit and miss” so I now always “lock film base color” before doing anything else.
As you can see below I have selected an area (shown by the dotted line) from a strip of 6 frames which includes the 5 black bars which divide the frames. Vuescan is clever enough to detect these black bars – it must be able to look for areas of very similar dark colour and say “this is black” and lock this as the base colour.

Once this area is selected I will untick the “lock base color” box and select “refresh” from the image menu then re-tick the “lock base color” box.
One this is re-ticked we can now look at the “color” tab and actually see which film base colours it has detected:

I’m using Fuji Superia 200 film for this example and it has detected film base colours of 0.41, 0.368 and 0.334 for red, green and blue respectively. I have noticed that this figure will change very slightly with each strip I scan but only very slight changes, which proves that it is accurately detecting the film base colours.
OK now we are nicely locked into the correct film base color then we can select the actual frame we want to use.

Once this is roughly selected we can use the handy magnifying glass icon at the bottom of the screen to enlarge the view to get a really accurate crop

I always aim to crop very slightly inside the frame so no black edge bits show in the final scan.
Once I have an accurate crop in the “preview” view I will select the “scan” view which gives a much better quality preview of the area you have cropped:

The next step is to let vuescan know what you want to “show as white” – I find the best bet is to look for an area of the image that is meant to be white and “right click” on that bit of the image. This image has useful white reference areas such as the window frames to right click on. What I do is to try right clicking on a few different white areas till I get the white balance I’m happy with. If there is no white in the frame you can click on a neutral gray area, but I find white areas give the best results. White clouds work really well as well.
Once you have set the white balance the final stage is to save the file. I generally save as a jpeg as I don’t normally post process in an external editor but if you want to post process then save as a tiff rather than a jpeg! To save the file you simply click on the floppy disk icon near the bottom right of the screen. Do you still remember what floppy disc looks like as they have not really been used in the last decade? ;-)
Here is the output screen where you select your chosen output file format

